Most video content from remote interviews underperforms - not because the conversation was bad, but because the recording is. Muffled audio, a silhouetted speaker, a rambling answer with no clean cut point. All of it avoidable.
For founders and teams in deep tech and climate adaptation, a sharp 60-second LinkedIn clip from a customer or expert interview can do more than a month of written content. But that clip only exists if the recording is usable in the first place. This article covers everything you need to get that right: which platform to record on, how to get clean audio and video from a remote setup, and how to structure the conversation so editors have something to work with.
Choose your recording setup wisely
Riverside is the recommended platform for remote video, especially with external stakeholders, because it records high‑quality audio and video locally on each participant’s device rather than over the internet. Your regular meeting platform (Zoom/Teams/Meet) is suitable for informal or internal sessions, but aren’t reliable enough for polished video.
To get started, set up a dedicated "Interview Studio" in Riverside with consistent settings. This gives editors maximum flexibility and means all your recordings have a similar look and feel. Before your first external session, run a test call with a colleague. Verify links, confirm everyone can download their files, and check permissions. It takes 15 minutes and saves you from troubleshooting it in front of a guest. Your guest won’t need their own Riverside account - you will be able to share a simple call invite link that brings them to your studio seamlessly.
Setup guidance
Within studio settings, set audio and video quality to the maximum (or the highest your equipment will allow) and enable separate audio and video tracks for each participant.
Enable progressive upload/local recording so files upload as you speak and are safe even if someone’s connection drops mid‑call.
Hardware and connection
Encourage everyone to use a laptop or desktop rather than a phone, to ensure better stability, framing, and audio control.
Ask participants to sit as close as possible to their router and close any bandwidth‑heavy apps (VPNs, cloud syncs, streaming).
How to capture high-quality audio and visuals
Audio: priority number one
Encourage the use of an external USB microphone or a good headset wherever possible; this has more impact on perceived quality than any other upgrade.
Use quality headphones or earbuds to prevent echo and audio bleed from speakers into the mic.
Ask participants to record in a quiet space: close doors and windows, mute phones, turn off fans/AC units, and pause notifications on computers.
If a good headset is unavailable, a built‑in laptop mic will suffice - ask them to sit closer to the laptop and avoid typing or shuffling papers while speaking.
Framing and camera position
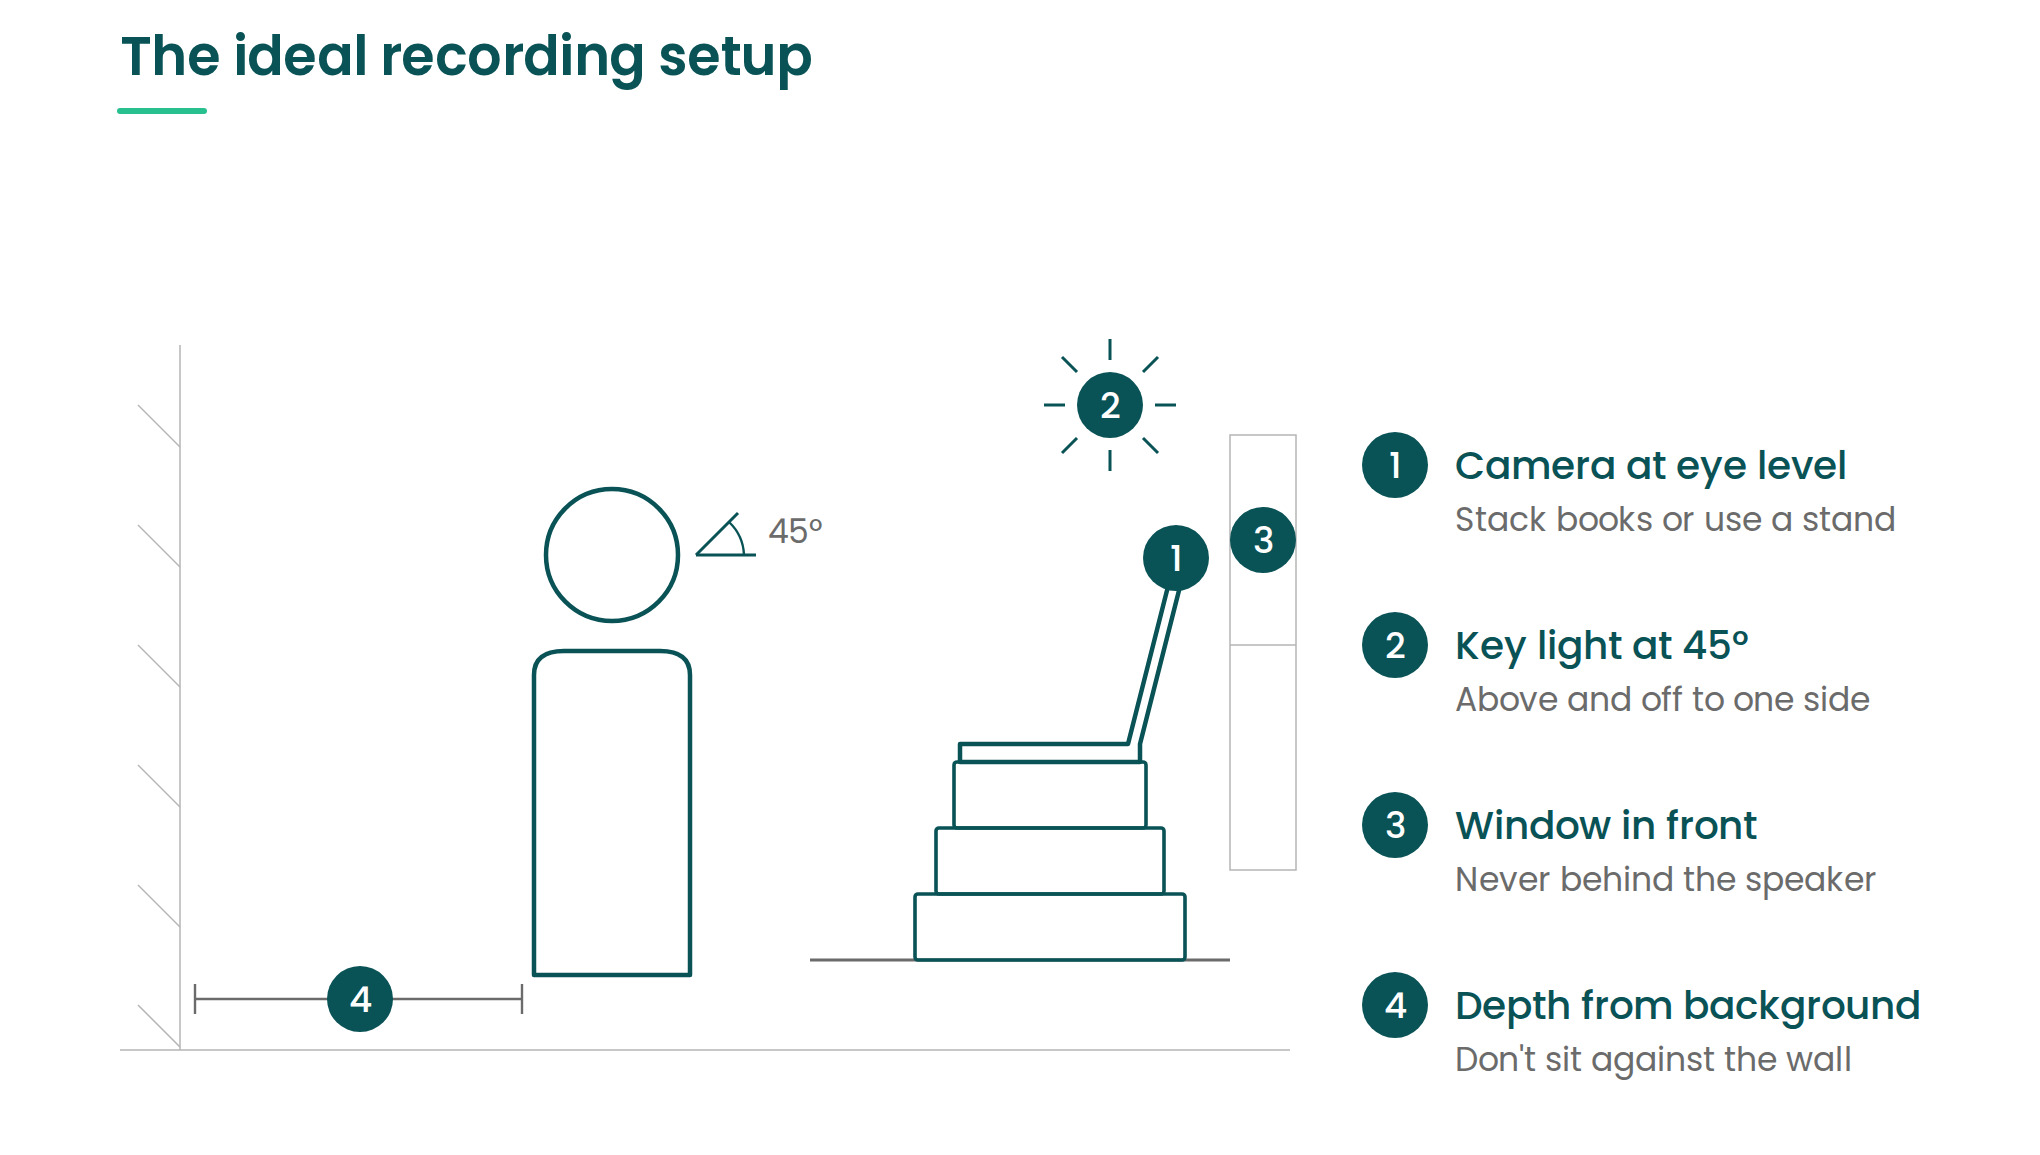
Place the camera at eye level or slightly above; stack a few books or use a laptop stand if needed to avoid the “looking down” angle.
Frame from mid‑chest to just above the head, with a little space above the head, so facial expressions are clear and hand gestures occasionally enter the frame.
Position the subject roughly in the centre of the screen.
Ask speakers to look towards the camera when giving key points (especially intros and “takeaway” answers) to create a more direct, engaging feel for clips.
Lighting
Aim for soft, front‑facing light: facing a window is ideal, but avoid sitting with a bright window behind the speaker, which causes silhouettes.
If possible, use a simple key‑light setup: a desk lamp or softbox placed at about 45 degrees to one side of the face and slightly above eye level, pointing down.
Check for harsh shadows or blown‑out highlights during a quick test recording and adjust angle, distance, or brightness as needed.
Background and environment
Opt for a clean, uncluttered background such as a plain wall, bookshelf, or tasteful home/office setting; remove distracting items.
Leave some depth between the subject and the background where possible (they shouldn’t be pressed up against a wall); this makes the image feel more three‑dimensional.
If you must use a virtual background, choose a simple, on‑brand option and test it beforehand to ensure it doesn’t glitch around hair or hands.
Ask participants to wear solid colours rather than tight patterns or pure white/black, which can cause issues on video.
Plan interviews for “snippable” content
Before the call
Define clear goals for the session: for example, “capture 3–5 clips that explain X topic to Y audience in under 90 seconds each.”
Prepare a short outline with 5–10 focused questions or themes rather than a rigid script; share this with the interviewee so they know the direction.
Share a one‑page “guest prep” note covering: Riverside link, browser recommendation, audio and lighting tips, and timing (join 5 minutes early for checks).
During the interview
Start with a friendly pre‑chat (off the record) to relax the guest, then explicitly confirm on record that they are happy to be recorded and for clips to be reused.
Ask one clear question at a time and aim for answers that are 60–120 seconds long; gently steer away from very long, meandering responses.
Prompt interviewees to restate the question in their answer, for example: “One way regulators are changing expectations is…” so clips make sense in isolation.
Use follow‑up prompts to sharpen answers: “Can you give a concrete example?” “What is the one takeaway for risk managers?”
If someone gives a brilliant answer but stumbles midway, simply say: “That was great, could you repeat that last part from ‘The key thing is…’?” and record a cleaner version.
Recommend that guests do not read directly from notes or pre-prepared answers. Reliance on these can disrupt the flow and conversation and be distracting.
After the interview
Immediately note down or mark timestamps for any standout answers or quotable phrases while the conversation is still fresh.
Save and label the recording and assets consistently (e.g. date, speaker name, topic) so it’s easy to find and reuse later.
Brief the editor or content owner with your target number of clips, audiences, and key themes, so they cut the material with LinkedIn in mind from the start.
FAQs
Do we need a professional recording setup to get usable clips?
No. A laptop with a decent external microphone, wired headphones, a front-facing window, and a tidy background is enough to produce clips that look and sound professional. The most important upgrade is always audio - a USB mic costs less than most other equipment and makes a bigger difference than a new camera.
Why not just use Zoom or Teams?
Zoom and Teams compress audio and video in transit, so quality depends on everyone's connection quality at the moment of the call. Riverside records locally on each device, which means the output is consistent regardless of network conditions. It also produces separate audio and video tracks per participant, which gives editors much more flexibility.
How long should individual answers be?
Aim for 60-120 seconds per answer. Shorter is fine if the point is complete. Longer answers are harder to clip because they're more likely to contain tangents, stumbles, or qualifications that dilute the central point.
What if a guest isn't comfortable on camera?
A short pre-call briefing helps significantly. Explain the format, share the prep note, and tell them you'll start with a few minutes off the record. Most discomfort on camera comes from uncertainty about how the recording will be used and what's expected. Clear expectations before the call reduce it considerably.
How do we get answers that make sense without the question?
Ask guests to restate the question in their answer. Prompt them directly: "It would help if you could start your answer with something like 'One challenge we see in the built environment space is...'" It feels slightly unnatural to the speaker but makes clips far easier to publish without context.
About the author:
Tim Carney
Account Manager
Tim is a content writer and account manager at Adopter, where he's been part of the team since the early days. His expertise sits at the intersection of nature and finance - covering the bioeconomy, nature-related risks, and innovative financing. He leads client accounts end to end, from strategy through to delivery, across social media, long-form content, and reports.

















.jpg)

